In the last few posts I have showed some examples of how to work with Google maps.
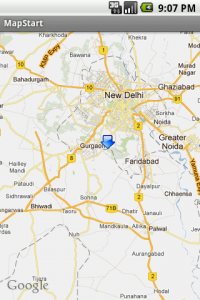
In this post I will show you how to add a marker in our desired position in the map.
Adding something on top of a map is called overlay.
Here we will create a class to add an overlay.
This code helps to add the overlay
MapOverlay mapOverlay = new MapOverlay();List<Overlay> listOfOverlays = map_view.getOverlays();listOfOverlays.clear();listOfOverlays.add(mapOverlay); |
Refer the previous posts for other resources and only change the java code as given below and also add a resource arrow.png to the res/drawable folder.
That is it.
Here is the modified java code.
package pack.coderzheaven;import java.util.List;import android.graphics.Bitmap;import android.graphics.BitmapFactory;import android.graphics.Canvas;import android.graphics.Point;import android.os.Bundle;import android.view.KeyEvent;import com.google.android.maps.GeoPoint;import com.google.android.maps.MapActivity;import com.google.android.maps.MapController;import com.google.android.maps.MapView;import com.google.android.maps.Overlay;public class MapDemo extends MapActivity { MapView map_view; MapController mc; GeoPoint p; @Override public void onCreate(Bundle savedInstanceState) { super.onCreate(savedInstanceState); setContentView(R.layout.main); map_view = (MapView)findViewById(R.id.mv); map_view.setBuiltInZoomControls(true); // Show the Zoom Controls //map_view.setSatellite(true); /** You can also display the map in street view, using the setStreetView() method: **/ //map_view.setStreetView(true); mc = map_view.getController(); String coordinates[] = {"28.38", "77.12"}; double lat = Double.parseDouble(coordinates[0]); double lng = Double.parseDouble(coordinates[1]); p = new GeoPoint( (int) (lat * 1E6), (int) (lng * 1E6)); mc.animateTo(p); mc.setZoom(10); MapOverlay mapOverlay = new MapOverlay(); List<Overlay> listOfOverlays = map_view.getOverlays(); listOfOverlays.clear(); listOfOverlays.add(mapOverlay); map_view.invalidate(); } @Override protected boolean isRouteDisplayed() { return false; } public boolean onKeyDown(int keyCode, KeyEvent event) { MapController mc = map_view.getController(); switch (keyCode) { case KeyEvent.KEYCODE_1: mc.zoomIn(); break; case KeyEvent.KEYCODE_2: mc.zoomOut(); break; } return super.onKeyDown(keyCode, event); } // This is the overlay that we add above the map..... class MapOverlay extends com.google.android.maps.Overlay { @Override public boolean draw(Canvas canvas, MapView mapView, boolean shadow, long when) { super.draw(canvas, mapView, shadow); //---translate the GeoPoint to screen pixels--- Point screenPts = new Point(); mapView.getProjection().toPixels(p, screenPts); //---add the marker--- Bitmap bmp = BitmapFactory.decodeResource( getResources(), R.drawable.arrow); canvas.drawBitmap(bmp, screenPts.x, screenPts.y-50, null); return true; } }} |
Please leave your valuable comments if you found this post useful.
Please wait for the next post on how to add a custom overlay with our own layout and getting the touch location on the map.
Complete source code of all google Maps examples will be available for download in the coming posts.
Please don’t forget to add your valuable comments on this post, because comments are our encouragements for future posts.

thanks for the example.
why is there -50 in line 93 ?
That is just to adjust the position of the marker.