With Providers and MultiProviders we can do easy StateManagement in Flutter.
State Management in Flutter
Watch Video Tutorial
Add Dependencies First
Go to your pubspec.yaml file add the below dependency,
I would recommend to add the latest dependency version, at this moment it is 4.0.4
provider: ^4.0.4
The Providers will have
- Change Notifiers
- Consumers
The Basic flow to update a state in Provider is to call notifyListeners() on the Listener class which in turn calls the Change Notifier and then the corresponding model Consumer widget will be triggered with the Model Data.
So Don’t get confused, it’s really easy. Let’s see how that works.
So we have two screens here
1. Home Screen
2. Add Items Screen
Aim:
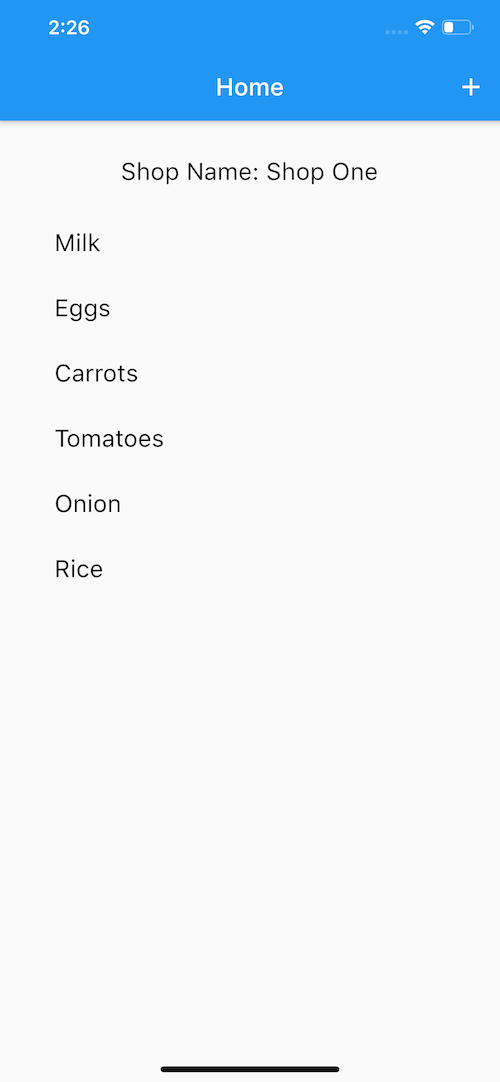
We will be creating a Shopping List here and the user should be able to add data to the Shopping list from anywhere in the Flutter Application.
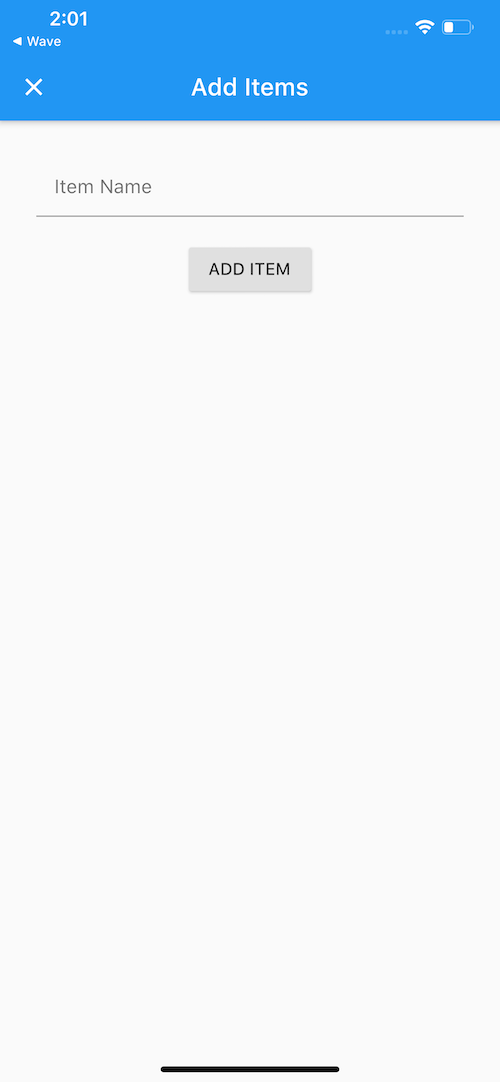
The Add Items Screen will have a Textfield and a button. When the user hits the button, he/she should be able to add data from the Add Item screen to the Home Screen and update the Shopping List in the Home Screen.
This can be achieved with the help of Providers.
First thing I need is a Notifier class for each of my DataModel.
Our model is called ‘Item’
class Item { String itemName; Item(this.itemName);} |
We also need a Notifier class named “ItemAddNotifier” which will look like this
import 'package:flutter/material.dart';import 'Item.dart';class ItemAddNotifier extends ChangeNotifier { // List<Item> itemList = [];addItem(String itemName) async { Item item = Item(itemName); itemList.add(item); notifyListeners(); }} |
So this is an individual class and we have not linked it to anything yet.
In the above class, you can see that it has extended ‘ChangeNotifier’ which means whenever there is some trigger for this model from anywhere in the application for the model ‘ItemAddNotifier’, this class will be triggered.
Let’ check this in the AddItemScreen class below
Create a new File named AddItemScreen.dart
Here is the build method for this screen.
TextField( controller: _itemNameController, decoration: InputDecoration( contentPadding: EdgeInsets.all(15.0), hintText: 'Item Name', ),),SizedBox( height: 20.0,),RaisedButton( child: Text('ADD ITEM'), onPressed: () async { if (_itemNameController.text.isEmpty) { return; } await Provider.of<ItemAddNotifier>(context, listen: false) .addItem(_itemNameController.text); Navigator.pop(context); },), |
Here you can see we are calling
Provider.of<ItemAddNotifier>(context) .addItem(_itemNameController.text); |
_itemNameController is the controller for the TextField.
This code will trigger the ‘ItemAddNotifier’ class and then you will have access to all the methods inside ‘ItemAddNotifier’ class. As you can see the above code the ‘addItem’ method is being called which calls the ‘addItem’ method in the ‘ItemAddNotifier’ class and add it to the data to the itemList in the class and then we are calling the important method ‘notifyListeners()’ which notifiers the ChangeNotifier that we have not written yet. Let’s write that.
So here we want to use the ItemAddNotifier across the application, not only for the HomeScreen.
For this reason, we need to add the ChangeNotifier to the root of the Application.
Let’s go to the main.dart file which is the entry point of your Flutter Application.
So here the main.dart file will look like this.
import 'package:flutter/material.dart';import 'package:flutter_demos/Provider/ItemAddNotifier.dart';import 'package:flutter_demos/Provider/ShopNameNotifier.dart';import 'package:provider/provider.dart';import 'Provider/HomeScreen.dart';void main() { runApp(HomeApp());}class HomeApp extends StatelessWidget { @override Widget build(BuildContext context) { return ChangeNotifierProvider<ItemAddNotifier>( create: (BuildContext context) { return ItemAddNotifier(); }, child: MaterialApp( debugShowCheckedModeBanner: false, home: HomeScreen(), ), ); }} |
In the above code, we are wrapping the whole Root Widget which is the MaterialApp widget inside the ‘ChangeNotifier’ widget. This makes sure that the whole application receives the updates whenever there is a change in the Shopping List.
Now it’s time to receive the Data anywhere in the application. In this example, we will consume it in the HomeScreen. The ‘Consumer’ widget with the correct ‘Notifier Class’ consumes the corresponding data. Here our Notifier is ‘ItemAddNotifier’
HomeScreen
import 'package:flutter/material.dart';import 'package:flutter_demos/Provider/AddItemScreen.dart';import 'package:flutter_demos/Provider/ItemAddNotifier.dart';import 'package:flutter_demos/Provider/ShopNameNotifier.dart';import 'package:provider/provider.dart';class HomeScreen extends StatelessWidget { // HomeScreen() : super();final String title = 'Home';@override Widget build(BuildContext context) { return Scaffold( appBar: AppBar( title: Text(title), actions: <Widget>[ IconButton( icon: Icon(Icons.add), onPressed: () { Navigator.push( context, MaterialPageRoute( fullscreenDialog: true, builder: (context) { return AddItemsScreen(); }, ), ); }, ) ], ), body: Container( padding: EdgeInsets.all(30.0), child: Column( children: <Widget>[ Expanded( child: Consumer<ItemAddNotifier>( builder: (context, itemAddNotifier, _) { return ListView.builder( itemCount: itemAddNotifier.itemList.length, itemBuilder: (context, index) { return Padding( padding: EdgeInsets.all(15.0), child: Text( itemAddNotifier.itemList[index].itemName, style: TextStyle( fontSize: 20.0, color: Colors.black, ), ), ); }, ); }, ), ), ], ), ), ); }} |
In the above code you can see the ‘Consumer’ widget
Consumer<ItemAddNotifier>( builder: (context, itemAddNotifier, _) { |
Here the second parameter is our Notifier. From the parameter you can access all the members in the Notifier class.
itemAddNotifier.itemList // like this
And That’s it.
Advantages
Whenever there is change in data for this Model, only the Consumer widget corresponding to that Model will be rebuilt
You can have any number of Consumers and update anywhere from the application
What if I have More Notifiers?
This is absolutely possible that you will have more than one data model and corresponding notifiers, in that case you can use ‘MultiProviders’.
Let’s say I have a ShopNameNotifier which looks something like this
import 'package:flutter/material.dart';class ShopNameNotifier extends ChangeNotifier { // String shopName = '';updateShopName(String shopName) async { this.shopName = shopName; notifyListeners(); }} |
So to add the Change Notifier, we will update the main.dart like this
import 'package:flutter/material.dart';import 'package:flutter_demos/Provider/ItemAddNotifier.dart';import 'package:flutter_demos/Provider/ShopNameNotifier.dart';import 'package:provider/provider.dart';import 'Provider/HomeScreen.dart';void main() { runApp(HomeApp());}class HomeApp extends StatelessWidget { @override Widget build(BuildContext context) { return MultiProvider( providers: [ ChangeNotifierProvider<ItemAddNotifier>( create: (BuildContext context) { return ItemAddNotifier(); }, ), ChangeNotifierProvider<ShopNameNotifier>( create: (BuildContext context) { return ShopNameNotifier(); }, ) ], child: MaterialApp( debugShowCheckedModeBanner: false, home: HomeScreen(), ), ); }} |
Here you can see we added the ‘MultiProvider’ widget with two ‘ChangeNotifierProvider’ with two models.
To Update the ShopName, call like below from any class.
Provider.of<ShopNameNotifier>(context) .updateShopName('Shop One'); |
And to Consume the data is simple,
Consumer<ShopNameNotifier>( builder: (context, shopNameNotifier, _) { return Text('Shop Name: ${shopNameNotifier.shopName}'); },), |
Thats it!!!
Done


Beautiful article.So simple to understand. Thanks for this.
Thank you. Please subscribe to my youtube channel here if you find my videos useful.
Pingback: #Google's Flutter Tutorial - Easy State Management using Providers in Flutter (coderzheaven.com) - TutsFx